Getting Started PTB: Difference between revisions
m Updated release version |
|||
| Line 20: | Line 20: | ||
1. Fetch changes from [https://git.app.uib.no/pct/wp3|wp3 upstream repo] | 1. Fetch changes from [https://git.app.uib.no/pct/wp3|wp3 upstream repo] | ||
2. Checkout tag of your select release. See [https://git.app.uib.no/pct/wp3/-/releases|latest releases]. This guide | 2. Checkout tag of your select release. See [https://git.app.uib.no/pct/wp3/-/releases|latest releases]. This guide assumes PTB-v3.1-beta3 | ||
<syntaxhighlight lang="bash"> | <syntaxhighlight lang="bash"> | ||
$ git checkout PTB- | $ git checkout PTB-v3.1-beta3 | ||
</syntaxhighlight> | </syntaxhighlight> | ||
| Line 31: | Line 31: | ||
<syntaxhighlight lang="bash"> | <syntaxhighlight lang="bash"> | ||
$ make get_latest_bitstream TAG=PTB- | $ make get_latest_bitstream TAG=PTB-v3.1-beta3 | ||
</syntaxhighlight> | </syntaxhighlight> | ||
Latest revision as of 09:50, 14 May 2020
Superfast flow
The PTB stores the bitstream, embedded software and a bootloader on a flash memory. A power cycle will not reset this. Thus, one can use the PTB by simply turning in on. By checking the serial debug output, one can check if the correct version is running.
1. (Optional) Start debugging stream. Shows messages from embedded system once programmed.
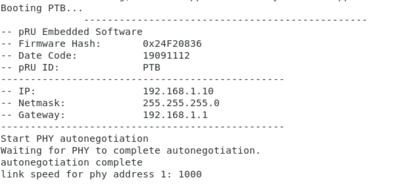
The serial debug window should have something like the following output:
$ make serial
Getting Started
1. Fetch changes from upstream repo
2. Checkout tag of your select release. See releases. This guide assumes PTB-v3.1-beta3
$ git checkout PTB-v3.1-beta3
3. Make sure repo is clean
4. Get pre-built bitstream.
$ make get_latest_bitstream TAG=PTB-v3.1-beta3
5. Build embedded software
$ make sdk_gen_projects PRJ=PTB
6. (Optional) Open a new terminal window and start debugging stream. Shows messages from embedded system once programmed.
$ make serial
8. Generate bootloader and program flash
$ make gen_bootimage
$ make program_flash
9. Restart PTB
The serial debug window should have something like the following output:

