Running pDTPClient: Difference between revisions
No edit summary |
No edit summary |
||
| (5 intermediate revisions by the same user not shown) | |||
| Line 6: | Line 6: | ||
The pDTPClient handles the proton Data Transfer Protocol (pDTP) using UDP. | The pDTPClient handles the proton Data Transfer Protocol (pDTP) using UDP. | ||
pDTP | pDTP has three main modes; Request read (RQR), a single packet from 1 byte to 4080 bytes. Request stream (RQS), a single packet up to 65535 packets. And request full stream (RQFS). For more in-depth details about pDTP see: | ||
[[Media:PDTP.pdf | pDTP spesification]] | [[Media:PDTP.pdf | pDTP spesification]] | ||
If the | If the file writer is enabled the client will produce time and date stamped file that in a binary format. | ||
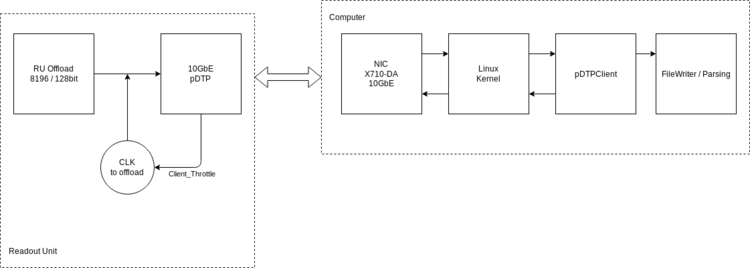
== Simplified diagram of offload chain == | |||
[[File:offload-system.png|750px]] | |||
== Optimal configuration == | |||
Due to the RUs ability to max out the 10Gbit link with small package sizes (high burst) and the Linux kernels inability to process large amounts of packages, an optimal configuration is advised. | |||
There is also a consideration to be made with the size of the queue between the pDTPClient and the file writer/parser. | |||
The config file in the next section is a good starting point on an optimal configuration. | |||
== The config file == | == The config file == | ||
| Line 25: | Line 35: | ||
#Start mode: RQT, RQR, RQS, RQFS, GS, ABRT | #Start mode: RQT, RQR, RQS, RQFS, GS, ABRT | ||
MODE = RQS | MODE = RQS | ||
#Time to run client in seconds: 0 for disable. | #Time to run the client in seconds: 0 for disable. | ||
RTIME = 0 | RTIME = 0 | ||
#UDP recv timeout in microsecounds, 0 to disable | #UDP recv timeout in microsecounds, 0 to disable | ||
| Line 51: | Line 61: | ||
<code>./pDTPClient --config <location/config.conf></code> | <code>./pDTPClient --config <location/config.conf></code> | ||
== Using a hardware emulator == | |||
The hardware emulator can be obtained from the [https://git.app.uib.no/pct/pDTP pDTP repo] | |||
=== Starting the emulator === | |||
Load server with only constant data: | |||
<syntaxhighlight lang="bash"> | |||
python3 server_emulator.py | |||
</syntaxhighlight> | |||
Load a file with data: | |||
<syntaxhighlight lang="bash"> | |||
python3 server_emulator.py -f <FILENAME> | |||
</syntaxhighlight> | |||
Increase verbosity (prints all debug messages to console. Note that these can be viewed in debug.log as well): | |||
<syntaxhighlight lang="bash"> | |||
python3 server_emulator.py -v | |||
</syntaxhighlight> | |||
=== Adapt the config file === | |||
You can adapt the config file to use <code>IP = localhost</code> to connect to the emulator when it is running. | |||
Latest revision as of 20:29, 17 September 2020
Main Page -> Control & Readout Software Documentation and Howto's -> Running pDTPClient
Use case
The main task of this program is to get data from the proton Readout Unit (pRU) hardware to a host computer for storage or parsing.
The pDTPClient handles the proton Data Transfer Protocol (pDTP) using UDP. pDTP has three main modes; Request read (RQR), a single packet from 1 byte to 4080 bytes. Request stream (RQS), a single packet up to 65535 packets. And request full stream (RQFS). For more in-depth details about pDTP see: pDTP spesification
If the file writer is enabled the client will produce time and date stamped file that in a binary format.
Simplified diagram of offload chain
Optimal configuration
Due to the RUs ability to max out the 10Gbit link with small package sizes (high burst) and the Linux kernels inability to process large amounts of packages, an optimal configuration is advised.
There is also a consideration to be made with the size of the queue between the pDTPClient and the file writer/parser.
The config file in the next section is a good starting point on an optimal configuration.
The config file
The config file exists to load the diffrent settings of the client in a easy manner.
#Config file for the settings to the pDTPClient
#IP adress to the PRU
IP = 192.168.100.200
#IP = 127.0.0.1
#PORT 30000 for data and 29070 for loopback
PORT = 30000
#Size of request stream 1 to 65535
SSIZE = 10
#Size of packet, 1 to 4080
PSIZE = 4080
#Start mode: RQT, RQR, RQS, RQFS, GS, ABRT
MODE = RQS
#Time to run the client in seconds: 0 for disable.
RTIME = 0
#UDP recv timeout in microsecounds, 0 to disable
UDPTIMEO = 4
#Request a certain number of words, then stop the client, 0 to disable
NUMREQ = 0
#Set the verbosity for log messsages to console
VERB = 2
#Set the size of the SPSC queue
SPSCSIZE = 10000
#Poll PRU, yes = 1, no = 0
POLL = 1
#FileWriter Enable = 1, Disable = 0
ENABLEFILE = 1
#How to handle the buffer fill level, 0 = no RQS,RQFS, 1 = RQS, no RQFS or
#2 = RQS and RQFS.
SMODE = 0
#Set no wait flag
NOWAIT = 0
#Set maximize flag
MAXIMIZE = 0
Starting the client
The client can be run with the command:
./pDTPClient --config <location/config.conf>
Using a hardware emulator
The hardware emulator can be obtained from the pDTP repo
Starting the emulator
Load server with only constant data:
python3 server_emulator.pyLoad a file with data:
python3 server_emulator.py -f <FILENAME>Increase verbosity (prints all debug messages to console. Note that these can be viewed in debug.log as well):
python3 server_emulator.py -vAdapt the config file
You can adapt the config file to use IP = localhost to connect to the emulator when it is running.

